Black Velvet Preset Tutorial On Lightroom For Beginners
Have you come across the Black Velvet Preset on Lightroom and you want to find out how it was made? Black Velvet Preset is just a custom name by Mbah Chinedu Emmanuel, the author of this blog and also the creator of hundreds of premium preset files. I, Mbah Chinedu E. am a Lightroom Editor expert who has created so many premium presets and also teaches how to create them for free.
In this tutorial, I have explained how I created the Black Velvet preset, listing out all the settings I used. Whether you are new to Lightroom editing or this is your first time creating preset, with this easy step-by-step guide, you have nothing to worry about. Let’s dive into it.
What is Black Velvet Preset?
The Black Velvet preset is a set of photo editing settings that can give images an intense black tint or a soft matte feel. This preset is available on software and applications and is also known as a photo filter, style, and Photoshop plugin. I was inspired by the soft matte feel it gives my images while preserving detail. It gives pictures this intense black tint and can be used to achieve dramatic effects similar to those seen in professional advertising photography.

How do I create the Black Velvet Preset?
Download and Install Adobe Lightroom app
To create this preset, you need to download and install the Adobe Lightroom app on Google Playstore for Android devices and Apple App store for iPhone users. If you already have this application, then just move on to the next step.
Importing a default image for the edit
- After installing the Lightroom app, launch the app and navigate to where your pictures is on your device by clicking the Device option at the bottom.
- Select the image you want to use by tapping it.
- On the next screen, check the bottom of your screen; you will see some menu icons.
- Click on the edit icon to proceed with the editing.
Editing the Lights and Curves on Lightroom
- Click on Lights from the bottom menu icons.
- Leave the Exposure at 0, Contrast +13, Highlights +12, Shadows -31, Whites -49, Blacks -13.
- Tap on Curve, you will see four circles at the bottom (White, Red, Green, Blue)
- Tap on White, drag the dots and set as in the image below.
If you do not know how to edit curves on Lightroom mobile, consider watching my tutorial on how to edit curves on Lightroom mobile on my YouTube Channel.
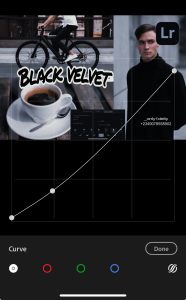
- Leave Red, and Green circle as default.
- Select Blue, and set the dots as I did in the picture below.
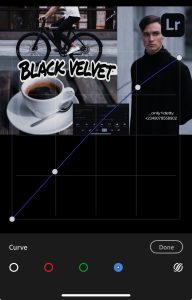
- Click on Done when you are done.
Editing the Color Grading and Color Mix
Under Color, we have some features here that we will be adjusting too. These are the Grading, Color mix, and White Balance. Under color mix, you will see about eight (8) colors, which we will be editing. While the Grading is of four (4) circles of color wheel, which I have also illustrated how I managed to edit too. Check the below instructions and follow them accordingly.
- Leave the Temp at 0, Tint at 0, adjust Vibrance to +9, and Saturation at 0
- Tap on Grading, you will see 4 circle at the top of the big circle. Select the first circle then scroll down. Expand the arrow where you see Shadows.
- Set Hue at 217, Saturation at 6, Luminance at 0, Blending at 50, and Balance at -100. In case you don’t know how to adjust these sliders, please check my YouTube tutorial on how to drag and adjust Colors and Grading on Lightroom mobile.
- Click the last circle and adjust the Luminance to -81, leave the Hue and Saturation at 0.
- Click on Done when done.
- Select Color mix, leave Red and Orange as default.
- Tap Yellow, set Hue as -87, Saturation as -76, and Luminance as -35.
- Tap Green, set Hue as -35, Saturation as -90, and Luminance as +17.
- Select Light Blue, set Hue as 0, Saturation as -100, and Luminance as -60.
- Tap Blue, set Hue as 0, Saturation as -90, and Luminance as -35.
- Click Purple, set Hue as -27, Saturation as -100, and Luminance as +14.
- Tap Pink, set Hue as +6, Saturation as -100, and Luminance as -38. Click on Done when done.
Editing Effects (Effects, Vignette, and Grain)
In this preset, we will not be making use of any of the options under Effects. Thus, the Effects, Grains, and Vignette will be left as default.
Adjusting Detail (Sharpening, Noise, and Color noise)
- At the bottom menu, click on Detail, then select on Sharpening from the options where you see Sharpening, Noise, and Color noise.
- Set Sharpening to 26, Radius to 1.0 or 1.00, Detail at 25, and Masking at 0.
- Navigate to Noise, then set Noise reduction to 20, Detail to 50, and Contrast at 15.
- Tap on Color noise, set Color noise reduction at 19, Detail at 69, and Smoothness at 78.
Exporting the Black Velvet Preset
Always keep in mind that presets are in DNG format. This will enable others or you to be able to reuse this preset later. Also, you will be able to apply this newly created preset with one click on your pictures by just copying the settings. The difference between saving this as PNG, JPG or JPEG and DNG, as explained before, is that presets are DNG files while pictures are PNG, JPG, or JPEG. So, always check if the preset you are trying to copy settings from or applying to your pictures is in DNG format. E.g., Cinematic Preset.dng.
- To save or export this preset, click on the envelope icon you see at the top, and some options will display.
- From the options, select Export as…
- Leave the file type as default (DNG), click on the mark icon at the top right.
- It will ask you where you want to share this file; please select the files or share them with your social friends. For iPhone users, scroll down to where you see save to files, then click on it.
- Choose the folder you want to save this preset file to and don’t forget to rename it with your custom name.
Note: I created a video on how to export presets from your Lightroom app to your files on my YouTube channel. Please don’t forget to subscribe to my YouTube channel for more tutorials like this.
Conclusion
If you read and followed my steps up to here, you would have learned how to create the Black Velvet preset and also boosted your editing skills on Lightroom. Don’t limit yourself to my tutorials only; try out something new by tweaking my settings. Feel free to adjust the preset to the one that best suits your image. This is because my settings can have a different impact on your picture as the light in these pictures is different.
Furthermore, I explained how to edit Colors, Grading, Details, Effects, Lights, and Curves to achieve that Black Velvet Preset. With links to my YouTube tutorial videos on how to do some features I explained in this tutorial. Below I also attached a YouTube video on how to create this preset, with voiceover on the step-by-step processes.
If you have any issues using this guide, please don’t hesitate to drop a comment below. Also, don’t forget to share this post with others, as this is how you support me, the author.
You can join my Free Lightroom Preset WhatsApp group or Free Lightroom Preset Telegram group where I share Preset files to my subscribers/group members. In my WhatsApp group, you meet other creators like you who share their edits and thoughts too. You can see lots of these tutorial videos I have on this blog in my YouTube channel. I teach how to sell, make money, and monetize this presets on my channel. Also, I do weekly giveaways to my subscribers on my YouTube channel. I share preset premium collections directly to their mail. Subscribing is totally free, so subscribe today.


