Guide to Create Brown Texture Preset on Lightroom as a Beginner on Mobile
Howto Create Brown Texture Preset from Scratch on Lightroom on Mobile
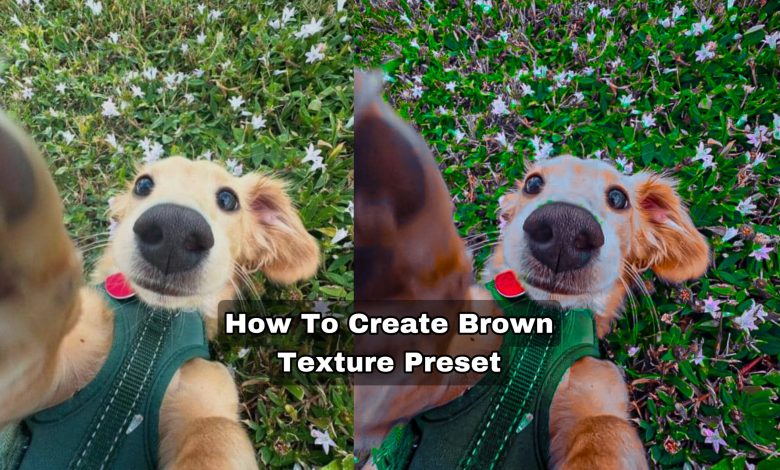
Brown Texture preset is one of the thousands presets we have. This preset is popularly known for it vintage, warm tones, rustic look and high texture. It was created by Mbah Chinedu Emmanuel, a photography expert from Nigeria. This brown texture preset is a predefine edit on Lightroom where it has settings already created for easy and fast editing. All you have to do is to apply the preset on your image and all of it settings will be on your image.
This article’s main goal is to show you how to make the Brown texture preset yourself rather than searching online for a preset. I’ve outlined every step you should think about in this post, along with my preset settings.
Understanding Brown Textures
What are Brown Textures?
Brown texture preset has a good texture and clarify. It beautifies your picture and give it that neutral, earthy, vintage, rustic and warm tone. It can be used in design like backgrounds, overlays, or photo editing.
Tools You Need (Mobile Apps)
Recommended Mobile Apps for Preset Creation is the Adobe Lightroom App.
Step-by-Step Guide to Create a Brown Texture Preset
Step 1: Choose Your Default Image
- Open the Lightroom app.
- Click on Device on the bottom menu
- Select an image (e.g., an existing photo or a blank canvas) to start with.
Note: Always use images that will complement the brown texture effect. Pictures with poor lighting is not considered good for this edit.
Step 2: Adjusting Basic Settings (Exposure, Contrast, and Saturation)
- Click on Light on the bottom panel then set Exposure at -0.20, Contrast -26, Highlights -71, Shadows +75, Whites -54, and Blacks -16.
- Leave the curve as it is by default.
Step 3: Applying Brown Tones
- Click on Color on the bottom panel, then set Temp +27, Tint 0, Vibrance +72, and Saturation +22.
- Click on Grading then tap on the first and third circle and set the color at blue as in the picture below.
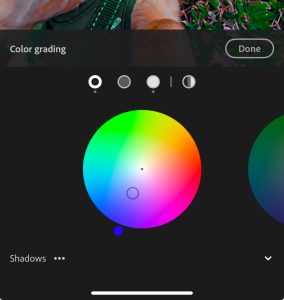
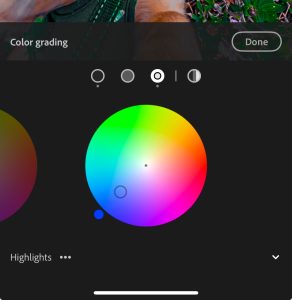
- Click on ‘Done‘ to save.
- Click on Color mix, then tap on red. Set Hue 0, Saturation -17, Luminance -16.
- Tap Orange, set Hue 0, Saturation -29, Luminance 0.
- Tap Yellow, set Hue -65, Saturation -100, Luminance +19.
- Click Green, set Hue +82, Saturation +73, Luminance -45
- Click Light Blue, set Hue -100, Saturation -43, Luminance +62.
- Tap on Blue, set Hue -13, Saturation -83, Luminance -25.
- Tap Purple, set Hue +40, Saturation +19, Luminance +24.
- Click Pink, set Hue -20, Saturation -56, Luminance +27, then click on “Done” to save.
- Click on Effects, set Texture +76, Clarity +34, Dehaze +43, Grain 0, Vignette -7, Midpoint 50, Roundness 0, Feather 50, and Highlights 0.
- Click on Detail, set Sharpening 28, Radius 1.0, Detail 65, Masking 0, Noise reduction 39, Detail 92, Contrast 39, Color noise 13, Detail 67, and Smoothness 80.
- Leave Optics as default.
Saving and Using the Preset
- Click on Share (envelop) icon then click on “Export as…”
- Leave it at DNG and click on the mark icon to save.
- You can further choose to share to social media or the location you want to save it to.
- Also, you can rename and categorize the file you just saved from your file manager for easy future use.
Tips for Beginners
Please be aware that testing your preset on various photos and images is crucial. This is because the preset you just made might not be able to compress certain images due to their quality or lighting. For greater consistency across different photographs, you must therefore modify the preset (e.g., altering exposure or saturation).
Additionally, you have the option to store your settings in a unique user preset list, which allows you to quickly test various presets on images. I’ll go over how to create and arrange several custom presets to a Lightroom user preset list in my upcoming post.
Conclusion
I’ve gone over every step to take into account when making the Flora preset in this post. I described how to improve midtones for a balanced feel and slightly brighten or modify exposure to create the ideal mood. Additionally, how to restore shadow detail and soften highlights for a balanced appearance. Without putting too much emphasis on texture, I added just enough clarity to bring out the subtleties.
Remember to customize the style by making adjustments according to the subject, lighting, and mood. Share the preset with others and save it for later use. Please feel free to leave a comment in the space provided below if you have any clarification-related queries, suggestions, or contributions.


