How To Create Cinematic Preset On Lightroom Mobile
Do you want to learn how to create Cinematic Preset on Lightroom? Cinematic preset is one of my thousand premium presets. As the name implies, it is a pre-defined set of editing settings on Lightroom, designed to give your photos a visual style that resembles the look and feel of a cinematic film, often with features like rich colors, deep shadows, subtle grain, and a specific color grading to create a dramatic or moody atmosphere; essentially, it instantly applies a “movie-like” aesthetic to your images with a single click.
My name is Mbah Chinedu Emmanuel, a Lightroom editing expert and I am also the author of this blog. I teach people how to create presets from scratch and also help enhance your editing skills on Lightroom. In this tutorial, I have explained all the steps and illustrated the settings I used to achieve this Cinematic look. Without further ado, let’s dive into it.
How to create the Cinematic Preset?
Download and Install Adobe Lightroom app
To create this preset, you will need to download and install the Adobe Lightroom app on Google Playstore for Android devices and Apple App store for iPhone users. If you already have this app, then just move on to the next step.
Importing the image you want to use for the edit
After installing the Lightroom app, Launch the app and navigate to where your pictures is on your device by clicking the Device option at the bottom.
Note: It is important to use a well-lit photo that doesn’t have an edit or filter applied to it already. This is because using a picture that already has filter on it will interfere with the whole editing process and will not give you the right result you are looking for.
Tap on the image you want to use to select it. On the next screen, check the bottom of your screen, you will see some menu icons. Locate the edit icon to proceed with the editing.
Setting Lights and Curves on Lightroom
- Tap on Lights from the menu icons at the bottom.
- Leave the Exposure at +0.35, Contrast +6, Highlights -40, Shadows +50, Whites -36, Blacks -13.
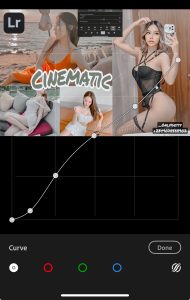
- Tap on Curve, you will see four circles at the bottom (White, Red, Green, Blue)
- Tap on White, drag the dots and set as in the image below. If you do not know how to edit curves on Lightroom mobile, considering watching my tutorial on how to edit curves on Lightroom mobile on my YouTube Channel.

- Leave Red, Green, and Blue circle as default, then click done.
Editing Color (Grading and Color Mix)
This is where we adjust the colors in the picture, reducing and increasing the amounts of certain colors to get the look we want.
- Leave the Temp, Tint at -12, adjust Vibrance to +11, and Saturation at 0
- Tap on Grading, you will see 4 circle at the top of the big circle. Select the first circle then scroll down. Expand the arrow where you see Shadows.
- Set Hue at 23, Saturation at 0, Luminance at +57, Blending at 68, and Balance at -100. In case you don’t know how to adjust these sliders, please check my YouTube tutorial on how to drag and adjust Colors and Grading on Lightroom mobile.
- Tap on the third circle and adjust Hue to 230, Saturation at 32, Luminance at 0, Blending at 68, and Balance at -100.
- Click the last circle and adjust the Luminance to -50, leave the Hue and Saturation at 0.
- Click on Done when done.
- Select Color mix, leave red as default, tap on orange and set Hue as 0, Saturation as -8, and Luminance as +15.
- Tap Yellow, set Hue as -69, Saturation as -79, and Luminance as -18.
- Tap Green, set Hue as -63, Saturation as -58, and Luminance as -21.
- Select Light Blue, set Hue as -73, Saturation as -73, and Luminance as -17.
- Tap Blue, set Hue as +17, Saturation as -90, and Luminance as -20.
- Click Purple, set Hue as 0, Saturation as -100, and Luminance as -16.
- Tap Pink, set Hue as 0, Saturation as -100, and Luminance as -30. Click on Done when done.
Editing Effects (Effects, Vignette, and Grain)
- Tap on Effect from the bottom menu bar, then select Effects again from where you see Effects, Vignette, and Grain.
- Set Texture as +26, Clarity as +10 , and Dehaze as +13.
- Tap Vignette and set Vignette as -2, Midpoint at 50, Roundness at 0, Feather at 50, and Highlights at 0.
- Tap on Grain, then set Grain as 12, Size as 25 and Roundness at 50.
Adjusting Detail (Sharpening, Noise, and Color noise)
- At the bottom menu, select Detail, then tap on Sharpening from the options where you see Sharpening, Noise, and Color noise.
- Set Sharpening to 15, Radius to 1.0 or 1.00, Detail at 25, and Masking at 0.
- Navigate to Noise, then set Noise reduction to 16, Detail to 50, and Contrast at 12.
- Tap on Color noise, set Color noise reduction at 16, Detail at 60, and Smoothness at 79.
Exporting the Cinematic Preset
We will be exporting this preset in DNG format. This will enable others or you to be able to reuse this edits or preset later. Also, you will be able to apply this newly created preset with one click on your pictures by just copying the settings. The difference between saving this as PNG or JPG or JPEG and DNG as explained before, Presets are DNG files while pictures are the others. So, always check is the preset you are trying to copy settings from or applying to your pictures are in DNG format. E.g. Cinematic Preset.dng.
- To save or export this preset, click on the envelop icon you see at the top, and some options will display.
- From the options, select Export as…
- Leave the file type as default (DNG), click on the mark icon at the top right.
- It will ask you where you want to share this file to, please select the files or share to your social friends. For iPhone users scroll down to where you see save to files, then click on it.
- Choose the folder you want to save this preset file to and don’t forget to rename it with your custom name.
Note: I created a video on how to export presets from your Lightroom app to your files on my YouTube channel. Please don’t forget to subscribe to my YouTube channel for more tutorials like this.
Conclusion
This is the end of this tutorial. If you read and follow these guidelines up to this point, you will not only have learnt how to create the Cinematic preset, but also develop and enhanced your editing skills on Lightroom mobile. You also have equipped yourself with how to create your own Lightroom presets from scratch.
In this tutorial, I have explained how to edit Colors, Grading, Details, Effects, Lights, and Curves to achieve that Cinematic Preset. With links to my YouTube tutorial videos on how to do some features I explained in this tutorial. Below I also attached a YouTube video on How to create this Preset, with step-by-step process in the video and a voice over explaining it.
If have any issue using this guide, please don’t hesitate to drop a comment below. Also, don’t forget to share this post to others as this is how you support me the creator.
Note: All content, videos and pictures are fully mine, I created everything I explained in this tutorial, I have great skills in creating presets and I have created lots of them. You can join my Free Lightroom Preset WhatsApp group or Free Lightroom Preset Telegram group where I share Preset files to my subscribers. You can see lots of these tutorial videos I have on this blog in my YouTube channel.


