How to Create Flora Preset on Lightroom from Scratch as Beginner
Tutorial on how to create Flora Lightroom presets from scratch as a beginner
What is Flora Lightroom preset? A Lightroom preset is a saved set of photo-editing settings that can be applied to an image with a single click. Presets can include adjustments to exposure, contrast, saturation, color grading, and more. A preset has all the settings ready to create a certain type of visual with just one click. Lightroom Presets are a quick and easy way to edit photos and can save time when working on large batches of images. They can also be used to spark inspiration, as you can try out new features by looking through the preset library.
Flora preset is one of Lightroom presets created by Erno Ybañez, a Philippine video creator with great skills in setting up Lightroom presets. It is popular for its grey, orange tone, and unique vibe.
In this article, I have explained with a step-by-step guide on how to create this unique Flora preset from scratch as a beginner. With the aid of screenshots and video tutorials. At the end of this article, you will be able to create any custom preset of your choice. Without further ado, let’s dive into it.
How To Create The Flora Preset From Scratch (A-Z Guide):
Flora Preset often uses specific tones like gray and warm orange. Take note that every image is different and not every preset will work on every single photo, so adjust the exposure and other settings if needed.
Step 1: Open Lightroom and Import your Photo
- Download and install the Lightroom app.
- Click on Device on the bottom options to access your photos on your device.
- Select a well-lit image, as this helps for a better result.
Step 2: Basic Adjustments
- Click on light on the bottom panel, then set Exposure at +0.16, Contrast +38, Highlights -92, Shadows +20, Whites -76, and Blacks -35.
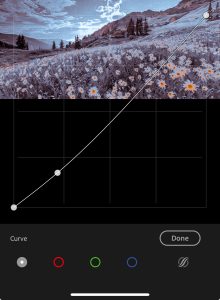
- Click on curve and then click on the white circle and slightly adjust the 7 & 9 box as shown in this picture.
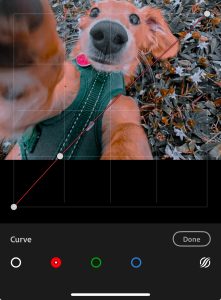
- Click on the red circle and slightly adjust the 9 box as shown in this picture.
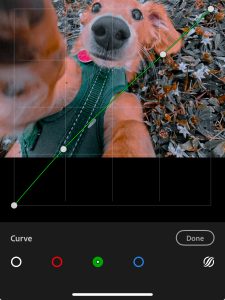
- Tap on the green circle and slightly adjust the 9 box as shown in this picture.
- Tap on the blue circle and slightly adjust the 4 box as shown in this picture. Then click on “Done” to save.

- Click on Color on the bottom panel, then set Temp 0, Tint 0, Vibrance +11, and Saturation 0.
Step 3: Color Grading the Flora Preset Style
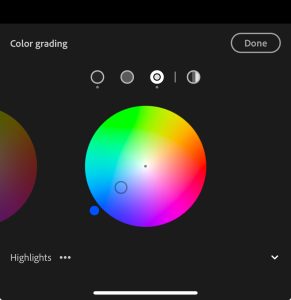
- Click on Grading then tap on the third circle and set the color to blue as in the picture below. Click on ‘Done‘ to save.
- Click on Color Mix, then tap on red. Set Hue 0, Saturation -13, Luminance +11.
- Tap Orange, set Hue 0-18, Saturation +26, Luminance +22.
- Tap Yellow, set Hue -100, Saturation +32, Luminance -27.
- Click Green, set Hue -100, Saturation -100, Luminance +30.
- Click Light Blue, set Hue -56, Saturation -21, Luminance 0.
- Tap on Blue, set Hue 0, Saturation -100, Luminance -12.
- Tap Purple, set Hue 0, Saturation -60, Luminance +30.
- Click Pink, set Hue 0, Saturation -49, Luminance +18, then click on “Done” to save.
Step 4: Fine-Tuning Details
- Click on Effects, set Texture +24, Clarity +22, Dehaze +19, Grain 0, Vignette -4, Midpoint 50, Roundness 0, Feather 50, and Highlights 0.
- Click on Detail, set Sharpening 15, Radius 1.0, Detail 25, Masking 0, Noise reduction 16, Detail 51, Contrast 14, Color noise 19, Detail 53, and Smoothness 72.
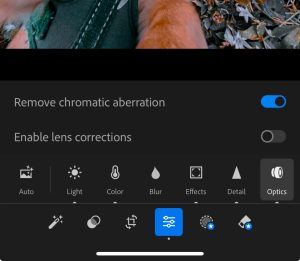
- Tap on Optics and tic the Remove chromatic aberration as shown in the picture below
Step 5: Save Your Flora Preset
- Click on the Share (envelope) icon, then click on “Export as…“
- Leave it at DNG and click on the mark icon to save.
- You can further choose to share to social media or the location you want to save it to.
- Also, you can rename and categorize the file you just saved from your file manager for easy future use.
Step 6: Testing and Tweaking the Flora preset
Please note that it is important to test your preset on different images/pictures. This is because some picture quality or lighting might not be really compactible with the preset you just created. Thus, you need to tweak the preset for better consistency across various photos (e.g., adjusting exposure or saturation).
Also, you can save your presets to a custom user preset list, where you can easily test different presets on pictures. In my next article, I will explain all the steps to add and organize different custom presets to a user preset list on Lightroom.
Conclusion
In this article, I have covered all the steps to consider when creating the Flora preset. I explained how to slightly brighten or adjust exposure for the desired mood and enhance midtones for a balanced feel. Also, how to soften highlights and recover shadow detail for an even look. I applied just enough clarity to sharpen details without overemphasizing texture.
You should not forget to personalize the look by adjusting based on the lighting, subject, and mood. Save the preset for future use and share it with others. If you have any contribution, suggestion or questions on clarity, please do not hesitate to drop your comment in the comment section below.


